OAuth is now a standard for implementing Google, Amazon, Apple, and Facebook login button. Users can sign in to your applications or NextJS website in one click with their social accounts. As a developer, you don't need to implement sign up, sign in, or recovery process from scratch.
As you may know, I'm a Next JS fan and built several Next JS templates with TypeScript. All the templates use my Next JS Starter Boilerplate. So, in this tutorial, we'll use Amplify and Cognito with NextJS and TypeScript.
Choose the right provider
Implementing an OAuth authentication in Next JS by yourself isn't a good idea. If you don't correctly implement it, you can have serious security issues because authentication is critical in any system. There are several authentication service providers, and some of the famous are Auth0, Firebase Authentication, and Amazon Cognito.
As indicated in the title, we'll use Amazon Cognito with Amplify AWS for the auth service. The reason we use these two services is that I'm mostly using AWS for my projects. So, I'm more familiar with Amazon ecosystem and couldn't use Firebase/Google. I also could use Auth0, the service is more cloud-agnostic. But, I choose Cognito over Auth0 for pricing reason: AWS has a generous free tier and the price per user is lower than Auth0.
Install AWS Amplify as a dependency
To use AWS Amplify, we need to install needed dependencies with the following command:
npm install aws-amplify @aws-amplify/auth
npm install @types/node @types/react typescript --save-dev # Optional TypeScript Support
npm install @aws-amplify/cli -g
The package naming of the dependencies is pretty easy to understand. One is the AWS Amplify core package, and another one is the Amplify Command Line Interface. We also install TypeScript related dependencies for NextJS, but it's optional.
Auth AWS Amplify configuration with command line
After installing Amazon Amplify, we need to create and configure AWS Cognito in your AWS account using Amplify CLI. First, we need to initialize the project at your project root folder:
amplify initAmplify CLI will ask you some questions about your project:
Note: It is recommended to run this command from the root of your app directory
? Enter a name for the project amplifyauth
? Enter a name for the environment dev
? Choose your default editor: Visual Studio Code
? Choose the type of app that you're building javascript
Please tell us about your project
? What javascript framework are you using react
? Source Directory Path:  src
? Distribution Directory Path: build
? Build Command:  npm run-script build
? Start Command: npm run-script start
Using default provider  awscloudformation

For more information on AWS Profiles, see:
https://docs.aws.amazon.com/cli/latest/userguide/cli-configure-profiles.html

? Do you want to use an AWS profile? Yes
? Please choose the profile you want to use default
Now, we can start creating and configuring AWS Cognito with AWS Amplify:
amplify add authSame as the previous step, Amplify command line will ask you some questions:
Using service: Cognito, provided by: awscloudformation

 The current configured provider is Amazon Cognito.

 Do you want to use the default authentication and security configuration? Default configuration with Social Provider (Federation)
 Warning: you will not be able to edit these selections.
 How do you want users to be able to sign in? Email
 Do you want to configure advanced settings? No, I am done.
 What domain name prefix do you want to use?
 Enter your redirect signin URI: http://localhost:8080/dashboard/
? Do you want to add another redirect signin URI No
 Enter your redirect signout URI: http://localhost:8080/
? Do you want to add another redirect signout URI No
 Select the social providers you want to configure for your user pool:
Successfully added auth resource amplifyauthXXXXXXX locally
After configuring Amplify Auth, we need to deploy to your AWS account with the following command:
amplify pushAdd identity provider in Cognito User Pool
Open AWS console, go to Cognito > Manage User Pools > Select the user pool created in the previous step. It'll load your user pool settings, and you'll able to click on Identity providers on the left sidebar:
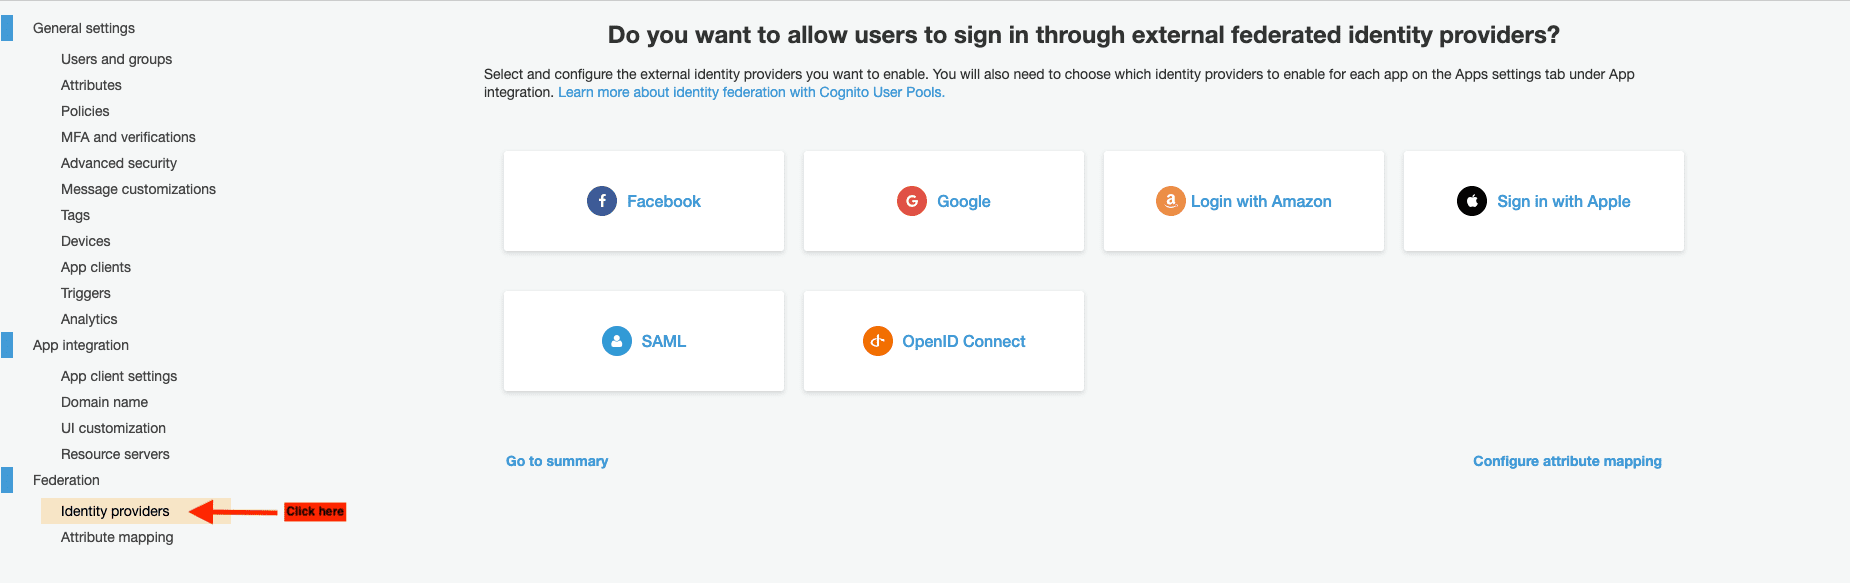
You can now select the social identity service you'll use. Then, you can add app ID, App secret, and scope:
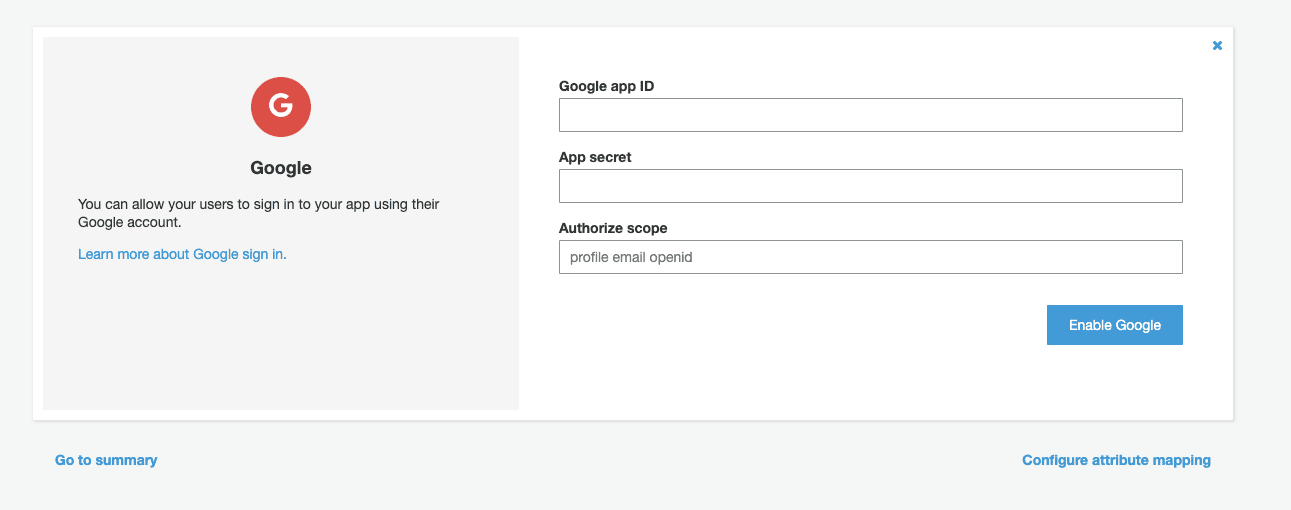
After enabling your identity provider, you also need to click on Attribute mapping on the left sidebar. Then, you can enable attributes based on your application requirements. For example, you can map users' email, name, etc.
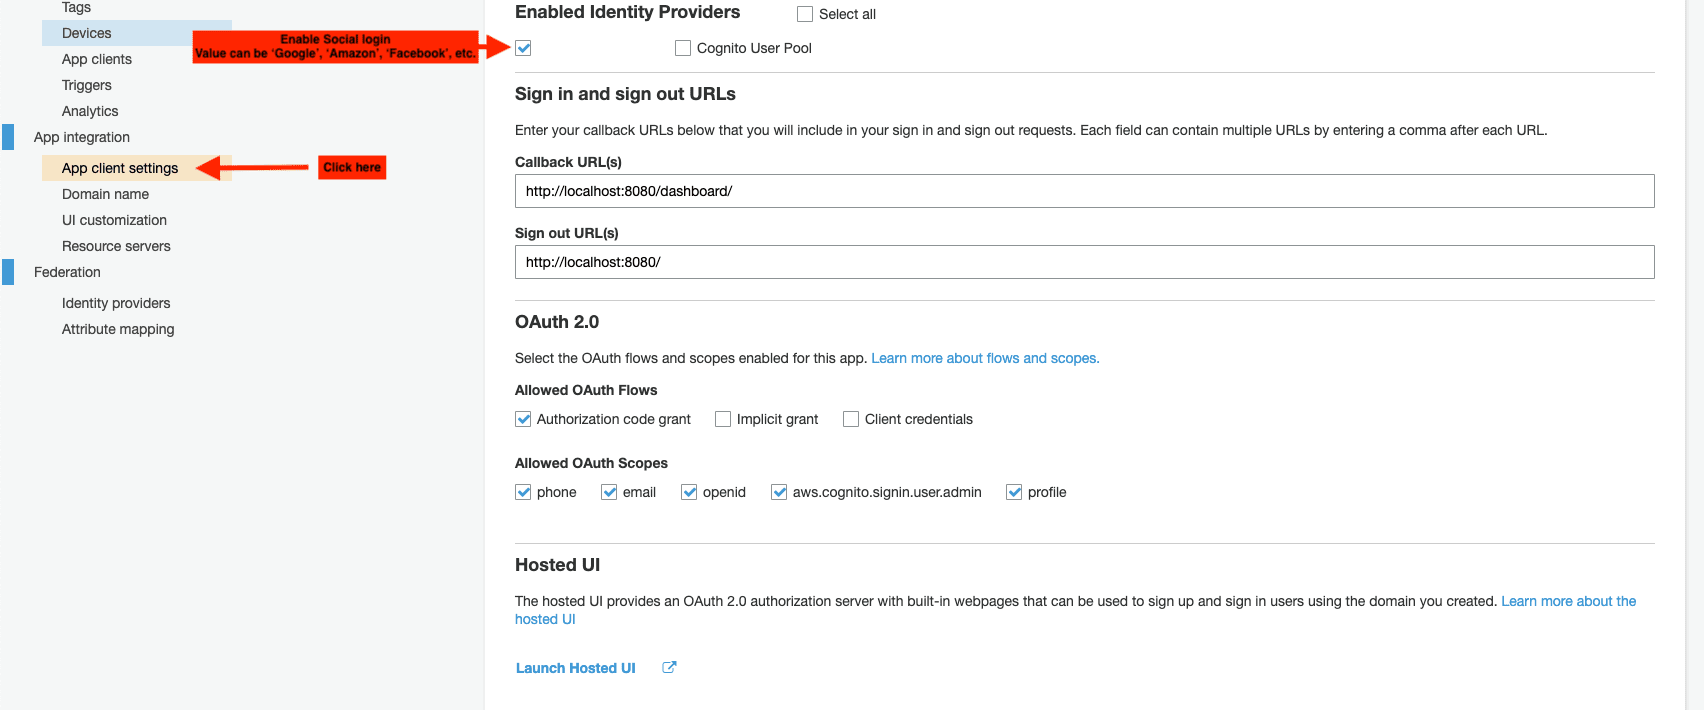
You also need to enable the identity service in App Client:
Verify Aws Amplify variables
After running Amplify CLI, you could see in your project a file named aws-exports.js and should be located in your src folder.
Enable NextJS trailing slash
In Amplify configuration, we indicate http://localhost:8080/dashboard/ as a signin URI (by the way, Amplify needs a trailing slash at the end of signin URI). So, in your Next JS configuration, we need to enable the trailingSlash option in the next.config.js file:
module.exports = {
  trailingSlash: true,
}
Login button in React
Now, we can implement the frontend in TypeScript and React. We can add the social sign-in button in your React page, pages/index.tsx:
import awsExports from "../src/aws-exports";
import Amplify, { Auth } from "aws-amplify";
import { CognitoHostedUIIdentityProvider } from "@aws-amplify/auth";

Amplify.configure(awsExports);

export default function Home() {
  return (
    <button
      onClick={() =>
        Auth.federatedSignIn({
          provider: CognitoHostedUIIdentityProvider.Amazon,
        })
      }
    >
      Open Amazon
    </button>
  );
}
In the previous code, we use Login With Amazon as an identity service. But, you can replace by Facebook, Google, Apple, etc.
The code is extremely simple: a classic React button with onClick handler calling Auth.federatedSignIn function.
Private space/dashboard in Next JS
In the next step, we need to create a private dashboard where only authenticated users can see it. Let's create a file named dashboard/index.tsx with the following boilerplate code:
import awsExports from "../../src/aws-exports";
import Amplify from "aws-amplify";

Amplify.configure(awsExports);

export default function Dashboard() {
  return <div>Dashboard</div>;
}
If we leave the previous code like that, everybody can see the dashboard, even a non-authenticated user. Aws Amplify provides a function named Auth.currentAuthenticatedUser that you can use to retrieve authenticated user information. If the user isn't signed in, the function will throw an exception:
import awsExports from "../../src/aws-exports";
import Amplify, { Auth } from "aws-amplify";
import { useEffect } from "react";

Amplify.configure(awsExports);

export default function Dashboard() {
  useEffect(() => {
    const getUser = async () => {
      try {
        const authenticatedUser = await Auth.currentAuthenticatedUser();

        console.log(authenticatedUser);
      } catch {
        console.log("The user isn't signed in");
      }
    };

    getUser();
  }, []);

  return <div>Dashboard</div>;
}
We want to run the arrow function getUser only once at the initial render. So, in the previous code, we use useEffect with a second parameter, an empty array [].
We can now improve the code by displaying the user email instead of doing a simple console.log:
import awsExports from "../../src/aws-exports";
import Amplify, { Auth } from "aws-amplify";
import { useEffect, useState } from "react";
import { CognitoUser } from "@aws-amplify/auth";

Amplify.configure(awsExports);

interface UserAttributes {
  sub: string;
  email: string;
}

/*
 * The following interface extends the CognitoUser type because it has issues
 * (see github.com/aws-amplify/amplify-js/issues/4927). Eventually (when you
 * no longer get an error accessing a CognitoUser's 'attribute' property) you
 * will be able to use the CognitoUser type instead of CognitoUserExt.
 */
interface CognitoUserExt extends CognitoUser {
  attributes: UserAttributes;
}

export default function Dashboard() {
  const [user, setUser] = useState<CognitoUserExt | null>(null);

  useEffect(() => {
    const getUser = async () => {
      try {
        const authenticatedUser = await Auth.currentAuthenticatedUser();

        setUser(authenticatedUser);
      } catch {
        console.log("The user isn't signed in");
      }
    };

    getUser();
  }, []);

  if (user) {
    return <div>Email: {user.attributes.email}</div>;
  }

  return null;
}
AWS Amplify gives a wrong type in the result of currentAuthenticatedUser, that's why we implemented two interfaces: UserAttributes and CognitoUserExt. Otherwise, we don't have access to attributes in user component state.
We use a React state to store user information. The result of currentAuthenticatedUser is stored in the component state with setUser method. So, when the user is authenticated, we can access to user.attributes. In the previous code, we retrieve the user email address.
Instead of doing a simple console.log when the user isn't signed in, we can redirect him to the homepage:
...
import { useRouter } from "next/router";
...
export default function Dashboard() {
  const router = useRouter();
  const [user, setUser] = useState<CognitoUserExt | null>(null);

  useEffect(() => {
    ...

    try {
      ...
    } catch {
      router.push("/");
    }
  };
...
Next JS provides a React Hook for handling routing called useRouter. By adding router.push("/"), we redirect the user to the homepage when Auth.currentAuthenticatedUser throws an exception. The exception is raised when the user isn't signed in.
Finally, you can find the result here:
import awsExports from "../../src/aws-exports";
import Amplify, { Auth } from "aws-amplify";
import { useEffect, useState } from "react";
import { CognitoUser } from "@aws-amplify/auth";
import { useRouter } from "next/router";

Amplify.configure(awsExports);

interface UserAttributes {
  sub: string;
  email: string;
}

/*
 * The following interface extends the CognitoUser type because it has issues
 * (see github.com/aws-amplify/amplify-js/issues/4927). Eventually (when you
 * no longer get an error accessing a CognitoUser's 'attribute' property) you
 * will be able to use the CognitoUser type instead of CognitoUserExt.
 */
interface CognitoUserExt extends CognitoUser {
  attributes: UserAttributes;
}

export default function Dashboard() {
  const router = useRouter();
  const [user, setUser] = useState<CognitoUserExt | null>(null);

  useEffect(() => {
    const getUser = async () => {
      try {
        const authenticatedUser = await Auth.currentAuthenticatedUser();

        setUser(authenticatedUser);
      } catch {
        router.push("/");
      }
    };

    getUser();
  }, []);

  if (user) {
    return <div>Email: {user.attributes.email}</div>;
  }

  return null;
}
In conclusion
Using AWS Amplify and Cognito in your React and Next JS projects, you can quickly implement an OAuth social sign-in. You can let your users connect to your apps and website using Google, Amazon, Apple, Facebook, or any major identity providers with a simple click. That means the user doesn't need to lose his time to sign up or validate his email. At the same time, you also don't need to implement all the authentication process, saving you development time.
In this tutorial, we've focused on the frontend and visual parts. In our next post, we'll share with you on how to protect your NextJS server-side pages and API routes.
You can also find my other Next JS tutorial at Next JS with ESLint and Prettier. My portfolio is available at Next JS templates if you want to support us.