Twitter is a popular social media platform for developers to share their thoughts, ideas, and opinions with a global audience. It's a great way to connect with other developers, stay up-to-date on the latest trends and technologies, and showcase their work to the world.
To get the most out of Twitter, you need to post regularly. By planning and scheduling your tweets in advance, you can save time and increase your engagement. There are many paid SaaS (Software as a Service) solutions that allow users to schedule posts on social media platforms. However, these services can be expensive and require a subscription.
In this article, we'll build our own solution using Next.js, a React framework for building full-stack applications. First, we need to save our tweets to a Redis database, Upstash. Then, we'll create a Next.js API route to fetch the tweets from the database. Finally, we'll use the Twitter API to post the tweets to our account.
UI and Forms
We start by creating a simple UI to schedule our tweets. As the creator of Next.js Boilerplate, I use my own boilerplate to get started. Next.js Boilerplate is a Next.js starter template that includes a fully configured project with all the tools you need to build a production-ready application. The source code for this project is available on GitHub at Next.js Boilerplate.
To get started, we need to add the following dependencies to our project:
npm install react-hook-form @upstash/redis @upstash/qstash axiosWe use the react-hook-form library to handle the form state. In src/pages folder, we create a new page add-tweet.tsx and add a simple form:
import axios from 'axios';
import { useForm } from 'react-hook-form';

const AddTweet = () => {
  const { register, handleSubmit, reset } = useForm();

  const onSubmit = handleSubmit(async (data) => {
    await axios.post('/api/add-tweet/', {
      ...data,
    });

    reset();
  });

  return (
    <form onSubmit={onSubmit}>
      <label>
        Message:
        <input type="text" {...register('message')} />
      </label>

      <label>
        Scheduled date:
        <input
          type="datetime-local"
          {...register('scheduledDate', { valueAsDate: true })}
        />
      </label>

      <input type="submit" value="Submit" />
    </form>
  );
};

export default AddTweet;Global Redis Database
For the database part, we use Upstash, a fully managed Redis database. Upstash is a solution for developers who want to build applications without worrying and managing the database. Another advantage of Upstash is that it can be run on the edge, which results in a faster response time. It works extremely well with Edge API Routes.
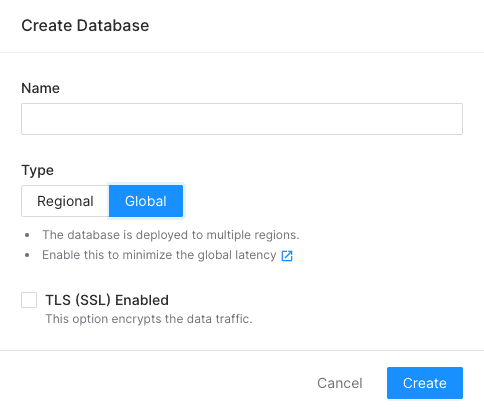
To get started, we need to create a new account on Upstash. Once you've created an account, you'll be able to create a new database. We use the free plan for this project, which includes 10,000 requests per month (2,000 for the global database).
Once you've created an Upstash account, you need to create a new database:
Connect to the Redis database
To connect to the Upstash Redis database, we use the @upstash/redis package. We also need to create a new file called src/utils/Redis.ts:
import { Redis } from '@upstash/redis';

export const redis = new Redis({
  url: process.env.UPSTASH_REDIS_REST_URL || '',
  token: process.env.UPSTASH_REDIS_REST_TOKEN || '',
});
To access the UPSTASH_REDIS_REST_URL value, go to your Upstash dashboard. Once you've copied the Redis REST URL, you can paste it into the .env file.
UPSTASH_REDIS_REST_URL=https://XXXXXXXX.upstash.ioIn addition to the UPSTASH_REDIS_REST_URL value, you also need to copy the UPSTASH_REDIS_REST_TOKEN variable from your Upstash dashboard. But, this time, please past the value into the .env.local file:
UPSTASH_REDIS_REST_TOKEN=XXXXXXXXIn order to keep our secret variables safe, it is a good practice to store them in the .env.local file. Since this file is not committed to the Git repository, our secrets will not be exposed to anyone who has access to the repository.
Edge API Routes to store in the database
We need to define a schema by creating a new file src/types/Tweet.ts:
export type IAddTweet = {
  message: string;
  scheduledDate: string;
};
Next, we create a new file src/pages/api/add-tweet.ts to handle the form submission. We use the @upstash/redis library to connect to our Redis database and save the tweet.
import type { NextRequest } from 'next/server';

import type { IAddTweet } from '@/types/Tweet';
import { redis } from '@/utils/Redis';

export default async function handler(req: NextRequest) {
  const reqJson: IAddTweet = await req.json();

  await redis.zadd('tweet', {
    score: new Date(reqJson.scheduledDate).getTime() / 1000, // convert to seconds
    member: reqJson.message,
  });

  return new Response(
    JSON.stringify({
      success: true,
    }),
    {
      status: 200,
      headers: {
        'content-type': 'application/json',
      },
    }
  );
}

export const config = {
  runtime: 'experimental-edge',
};
To make our API route accessible extremely fast, we use the Edge API Routes feature of Next.js. Edge API Routes are serverless functions that run on the edge. This means that our API route will be executed close to the user, which results in a faster response time.
Post on Twitter using code
We also need to create another API route to post automatically to Twitter.
To get started, we need to create a new Twitter app. Once you've created a new app, you'll be able to generate the necessary tokens. We use these tokens to connect to the Twitter API and create our first tweet using code.
We define a new variable TWITTER_BEARER_TOKEN in the .env.local file so that the application has the necessary permissions to post on Twitter.
In src/pages/api/schedule-tweet.ts, we add the following code:
import axios from 'axios';
import type { NextApiRequest, NextApiResponse } from 'next';

export default async function handler(
  _req: NextApiRequest,
  res: NextApiResponse
) {
  await axios.post(
    'https://api.twitter.com/2/tweets',
    {
      text: 'Test message',
    },
    {
      headers: {
        Authorization: `Bearer ${process.env.TWITTER_BEARER_TOKEN}`,
      },
    }
  );

  res.status(200).json({
    success: true,
  });
}
To test our API route, we can open localhost:3000/api/schedule-tweet in the browser. If everything is correctly set up, we should see a new tweet on your Twitter account.
Schedule your tweets
We've successfully created our first tweet programmatically, but to take things to the next level, we need to schedule our tweets for a specific time in the future. This way, we can ensure that our tweets are sent out at the most effective time for maximum engagement and reach.
Unfortunately, it only works if we run the API route manually. To automate the process, we need to use a cron job. A cron job is a task that runs periodically at a specified time. And, with Serverless Functions, we don't have access to a cron job. To solve this problem, we can use an external service like Upstash QStash. QStash is a scheduling solution for serverless applications.
Now, we need to update the API endpoint and we can retrieve the tweets from the database and check if any of them are scheduled to be posted. In src/pages/api/schedule-tweet.ts, we add the following code:
import { verifySignature } from '@upstash/qstash/nextjs';
import axios from 'axios';
import type { NextApiRequest, NextApiResponse } from 'next';

import { redis } from '@/utils/Redis';

async function handler(_req: NextApiRequest, res: NextApiResponse) {
  const currentTimestamp = Date.now() / 1000;
  const list = await redis.zrange('tweet', 0, currentTimestamp, {
    byScore: true,
  });

  for (let i = 0; i < list.length; i += 1) {
    // Run sequentially the requests to prevent overloading Twitter API
    await axios.post(
      'https://api.twitter.com/2/tweets',
      {
        text: list[i],
      },
      {
        headers: {
          Authorization: `Bearer ${process.env.TWITTER_BEARER_TOKEN}`,
        },
      }
    );
  }

  await redis.zremrangebyscore('tweet', 0, currentTimestamp);

  res.status(200).json({
    success: true,
  });
}

export default verifySignature(handler);

export const config = {
  api: {
    bodyParser: false,
  },
};
The verifySignature requires two environment variables: QSTASH_CURRENT_SIGNING_KEY and QSTASH_NEXT_SIGNING_KEY. These variables are used to verify the signature of the requests. So, we can make sure that the requests are coming from QStash and not from a bad actor. You can get these variable values from your Upstash dashboard.
You also need to deploy the Next.js application to a publically accessible URL. For example, you can deploy on Vercel. So, QStash can send a request to the API endpoint api/schedule-tweet.
After deploying your Next.js app, in your Upstash dashboard, you can go to the QStash section and create a new Request Builder. You also need to add the endpoint URL and the frequency of the cron job. In this example, it'll run the cron job every day.
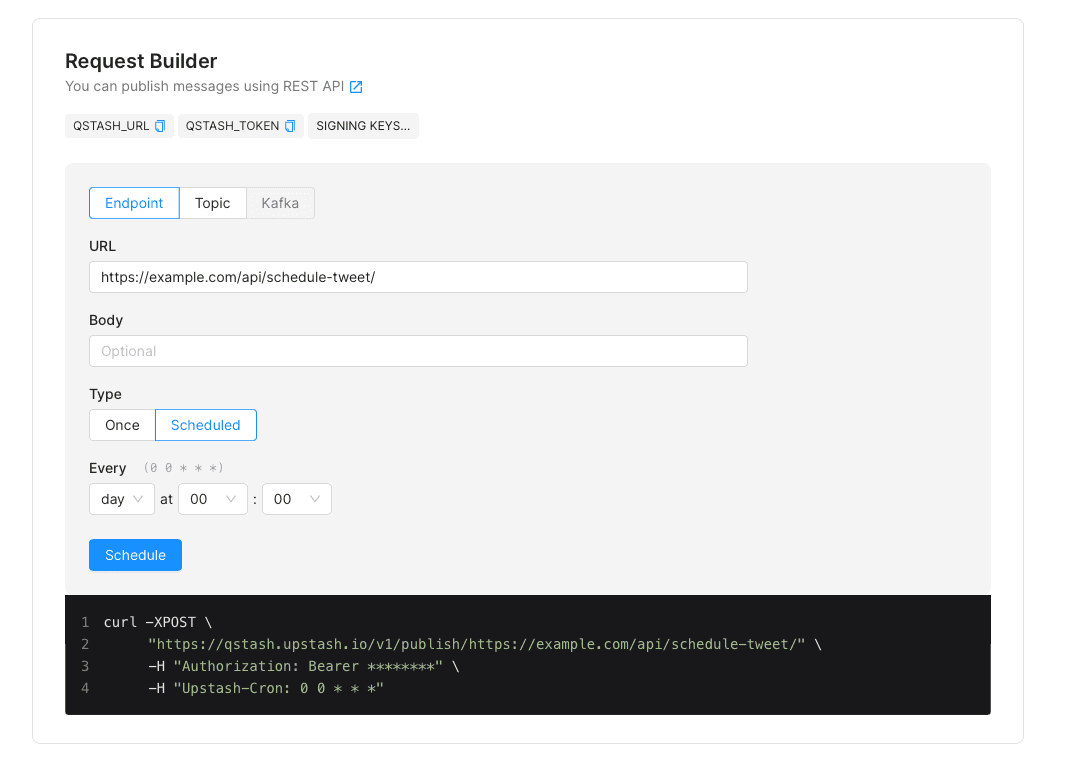
And, you can change the frequency of the cron job based on your needs. For example, you can change it to every minute or every hour.
Conclusion
In this article, we've built a Twitter scheduler using Next.js and Upstash. We've used Next.js API routes to store the tweets in a Redis database and schedule them for a specific time in the future. We've also used the Twitter API to post the tweets to our account.
By building your own Twitter scheduler, you can avoid using expensive SaaS solutions and save money. You can also use this project as a starting point and improve based on your needs.