Next.js is a complete full-stack framework built by Vercel for creating modern web applications. With Next.js you can write the frontend code and add the backend, NodeJS code of your application to the react framework as a single project.
Not only that, but Next.js also offers exciting features such as code-splitting for performance optimization, Search Engine Optimization (SEO), pre-rendering, API routing, client-side routing, and much more.
Supabase on the other hand is an open-source Firebase alternative. It provides authentication, a Postgres database, real-time subscription, and storage for the backend of your web application. According to their Supabase website, you can create a secure and fully functional backend in less than 2 minutes.
In this article, you will learn how to do the following:
- Install Tailwind CSS 3.0 to a Next.js app.
- Setup and connect to Supabase.
- Implement an e-mail and password Sign up page.
- Implement a Sign in page.
- Create a protected Dashboard page.
- Add Social login authentication with GitHub
How to Install Tailwind CSS 3.0 to a Next.js app
🚀 Open your terminal.
🚀 Run npx create-next-app@latest --ts nextjs-supabase, supabase-nextjs is the app’s name, so it can be anything you want to name your app.
npx create-next-app@latest --ts nextjs-supabase🚀 Install Tailwind CSS by running the command:
npm install -D tailwindcss postcss autoprefixer🚀 Create tailwind.config.js and postcss.config.js configuration file by running:
npx tailwindcss init -p🚀 Copy and paste the code below into the tailwind.config.js:
// tailwind.config.js
module.exports = {
  content: [
    "./pages/**/*.{js,ts,jsx,tsx}",
    "./components/**/*.{js,ts,jsx,tsx}",
  ],
  theme: {
    extend: {},
  },
  plugins: [],
}
🚀 Inside styles/global.css file replace the content by the following code:
@tailwind base;
@tailwind components;
@tailwind utilities;
If you encounter any issues during the installation, view the full Tailwind CSS guide with Next JS.
Add Supabase to the Next.js project
To set up the Supabase backend, do the following:
🚀 Make sure you are still in your project folder and run the command.
npm install @supabase/supabase-js🚀 Create an empty .env.local file - where the supabase credentials will be saved.
🚀 Visit https://app.supabase.io.
🚀 Create an account and a new supabase project.
🚀 On your dashboard, go to the “Settings” section.
🚀 Click “API” on the sidebar.
🚀 Find and copy your Supabase URL and SUPABASE ANON KEY.
🚀 Paste them as values into variables in the .env.local file:
NEXT_PUBLIC_SUPABASE_URL=YOUR_SUPABASE_URL
NEXT_PUBLIC_SUPABASE_ANON_KEY=YOUR_SUPABASE_ANON_KEY
Then, you need to create a file named src/utils/SupabaseClient.ts:
import { createClient } from '@supabase/supabase-js';

const supabaseUrl = process.env.NEXT_PUBLIC_SUPABASE_URL || "";
const supabaseAnonKey = process.env.NEXT_PUBLIC_SUPABASE_ANON_KEY || "";

export const supabase = createClient(supabaseUrl, supabaseAnonKey);
(Optional) Disable Email confirmation
For testing purpose, make sure you disable Enable email confirmations in your Supabase Authentication settings.
Implement an email and password Sign up page
The sign up function
const { error } = await supabase.auth.signUp({
  email,
  password,
});

if (error) {
  alert(JSON.stringify(error));
} else {
  router.push('/signin');
}
The supabase.auth.signUp() function accepts the email and password of the user. Then, if the user is successfully created, the user is notified and redirected to the sign in page.
Sign up page in full
Create a pages/signup.tsx file and paste the following code:
import React, { useState } from 'react';

import { useRouter } from 'next/router';

import { supabase } from '../src/utils/SupabaseClient';

const SignUp = () => {
  const router = useRouter();
  const [email, setEmail] = useState('');
  const [password, setPassword] = useState('');

  const handleSubmit = async (e: React.FormEvent) => {
    e.preventDefault();

    const { error } = await supabase.auth.signUp({
      email,
      password,
    });

    if (error) {
      alert(JSON.stringify(error));
    } else {
      router.push('/signin');
    }
  };

  return (
    <div className="h-screen flex items-center justify-center bg-gray-800">
      <div className="max-w-lg w-full">
        <h1 className="text-3xl font-semibold text-center text-white">
          Create new account
        </h1>

        <form className="mt-2 flex flex-col p-6" onSubmit={handleSubmit}>
          <label htmlFor="email" className="text-gray-200">
            Email
          </label>
          <input
            className="py-2 px-4 rounded-md focus:outline-none focus:ring-2"
            type="email"
            id="email"
            value={email}
            onChange={(e) => setEmail(e.target.value)}
          />

          <label htmlFor="password" className="mt-6 text-gray-200">
            Password
          </label>
          <input
            className="py-2 px-4 rounded-md focus:outline-none focus:ring-2"
            type="password"
            id="password"
            value={password}
            onChange={(e) => setPassword(e.target.value)}
          />

          <button
            className="mt-10 text-lg text-white font-semibold bg-green-500 py-3 px-6 rounded-md focus:outline-none focus:ring-2"
            type="submit"
          >
            Sign up
          </button>
        </form>
      </div>
    </div>
  );
};

export default SignUp;
Here is the result of the sign up page:

Implement the Sign in page
The log in function
const { error } = await supabase.auth.signIn({
  email,
  password,
});

if (error) {
  alert(JSON.stringify(error));
} else {
  router.push('/dashboard');
}
The supabase.auth.signIn() function verifies if the user has an account and makes sure that only verified user has access to the dashboard page. When the user is successfully authenticated, it redirects the user to the protected dashboard page.
Sign in page in full
Paste the following code into the pages/signin.tsx file:
import React, { useState } from 'react';

import { useRouter } from 'next/router';

import { supabase } from '../src/utils/SupabaseClient';

const SignIn = () => {
  const router = useRouter();
  const [email, setEmail] = useState('');
  const [password, setPassword] = useState('');

  const handleSignIn = async (e: React.FormEvent) => {
    e.preventDefault();

    const { error } = await supabase.auth.signIn({
      email,
      password,
    });

    if (error) {
      alert(JSON.stringify(error));
    } else {
      router.push('/dashboard');
    }
  };

  return (
    <div className="h-screen flex items-center justify-center bg-gray-800">
      <div className="max-w-lg w-full">
        <h1 className="text-3xl font-semibold text-center text-white">
          Sign in to your account
        </h1>

        <div className="flex flex-col p-6">
          <form className="flex flex-col" onSubmit={handleSignIn}>
            <label htmlFor="email" className="text-gray-200">
              Email
            </label>
            <input
              className="py-2 px-4 rounded-md focus:outline-none focus:ring-2"
              type="email"
              id="email"
              value={email}
              onChange={(e) => setEmail(e.target.value)}
            />

            <label htmlFor="password" className="mt-6 text-gray-200">
              Password
            </label>
            <input
              className="py-2 px-4 rounded-md focus:outline-none focus:ring-2"
              type="password"
              id="password"
              value={password}
              onChange={(e) => setPassword(e.target.value)}
            />

            <button
              className="mt-10 text-lg text-white font-semibold bg-green-500 py-3 px-6 rounded-md focus:outline-none focus:ring-2"
              type="submit"
            >
              Sign in with Email
            </button>
          </form>
        </div>
      </div>
    </div>
  );
};

export default SignIn;
Here is the result of the Sign in page:

Create a protected Dashboard page
Finally, the last page is the Dashboard, you can create a file name pages/dashboard.tsx:
import React, { MouseEventHandler, useEffect, useState } from 'react';
import { User } from '@supabase/supabase-js';
import { useRouter } from 'next/router';
import { supabase } from '../src/utils/SupabaseClient';
const Dashboard = () => {
const router = useRouter();
const [user, setUser] = useState<User | null>();
const handleLogOut: MouseEventHandler = async (e) => {
e.preventDefault();
const { error } = await supabase.auth.signOut();
if (error) {
alert(JSON.stringify(error));
} else {
router.push('/signin');
}
};
useEffect(() => {
const getProfile = () => {
const profile = supabase.auth.user();
if (profile) {
setUser(profile);
} else {
router.push('/signin');
}
};
getProfile();
}, []);
if (!user) {
// Currently loading asynchronously User Supabase Information
return null;
}
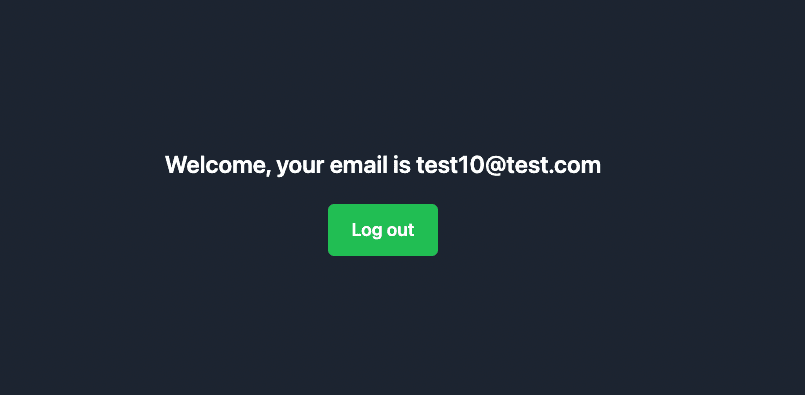
return (
<div className="h-screen flex items-center justify-center bg-gray-800">
<div className="max-w-lg w-full text-center">
<h1 className="text-2xl font-semibold text-white">
Welcome, your email is {user.email}
</h1>
<button
className="mt-6 text-lg text-white font-semibold bg-green-500 py-3 px-6 rounded-md focus:outline-none focus:ring-2"
onClick={handleLogOut}
>
Log out
</button>
</div>
</div>
);
};
export default Dashboard;Here is the result of the protected Dashboard page:
Retrieve user information and sign out function
supabase.auth.user() contains the user's details if a user is logged in, these details are available for use everywhere in your application. The function supabase.auth.signOut() enable users to logged out of the application. The useEffect function redirects the user to the login page if he/she is not signed in.
Adding GitHub Authentication
Then, in your Supabase Dashboard, you can create a GitHub OAuth application and set up the credential in your Supabase Authentication settings.
You can add this code sample in pages/signin.tsx for social auth with GitHub. But you can replace by any other third-party login system like Google, Apple, Facebook, Twitter etc.
const handleSignInWithGitHub: MouseEventHandler = async (e) => {
  e.preventDefault();

  const { error } = await supabase.auth.signIn(
    {
      provider: 'github',
    },
    {
      redirectTo: 'http://localhost:3000/callback/',
    }
  );

  if (error) {
    alert(JSON.stringify(error));
  }
};
Inside the render function, you also need to add the GitHub social button:
<button
  className="text-lg text-white font-semibold bg-blue-500 py-3 px-6 rounded-md focus:outline-none focus:ring-2"
  onClick={handleSignInWithGitHub}
>
  Sign In with GitHub
</button>

<hr className="bg-gray-600 border-0 h-px my-8" />
The social authentication validation happens asynchronously on Supabase side. We need to wait until the authentication is confirmed and redirect the user to the dashboard. So, we create a new page named pages/callback.tsx to handle this:
import { useEffect } from 'react';

import { useRouter } from 'next/router';

import { supabase } from '../src/utils/SupabaseClient';

const Callback = () => {
  const router = useRouter();

  useEffect(() => {
    const { data: authListener } = supabase.auth.onAuthStateChange(
      (event, sessionState) => {
        if (sessionState?.user) {
          router.push('/dashboard');
        }
      }
    );

    return () => {
      authListener?.unsubscribe();
    };
  }, []);

  return null;
};

export default Callback;
Sign in page in full with email authentication and social auth
The final code for the sign in page:
import React, { MouseEventHandler, useState } from 'react';
import { useRouter } from 'next/router';
import { supabase } from '../src/utils/SupabaseClient';
const SignIn = () => {
const router = useRouter();
const [email, setEmail] = useState('');
const [password, setPassword] = useState('');
const handleSignIn = async (e: React.FormEvent) => {
e.preventDefault();
const { error } = await supabase.auth.signIn({
email,
password,
});
if (error) {
alert(JSON.stringify(error));
} else {
router.push('/dashboard');
}
};
const handleSignInWithGitHub: MouseEventHandler = async (e) => {
e.preventDefault();
const { error } = await supabase.auth.signIn(
{
provider: 'github',
},
{
redirectTo: 'http://localhost:3000/callback/',
}
);
if (error) {
alert(JSON.stringify(error));
}
};
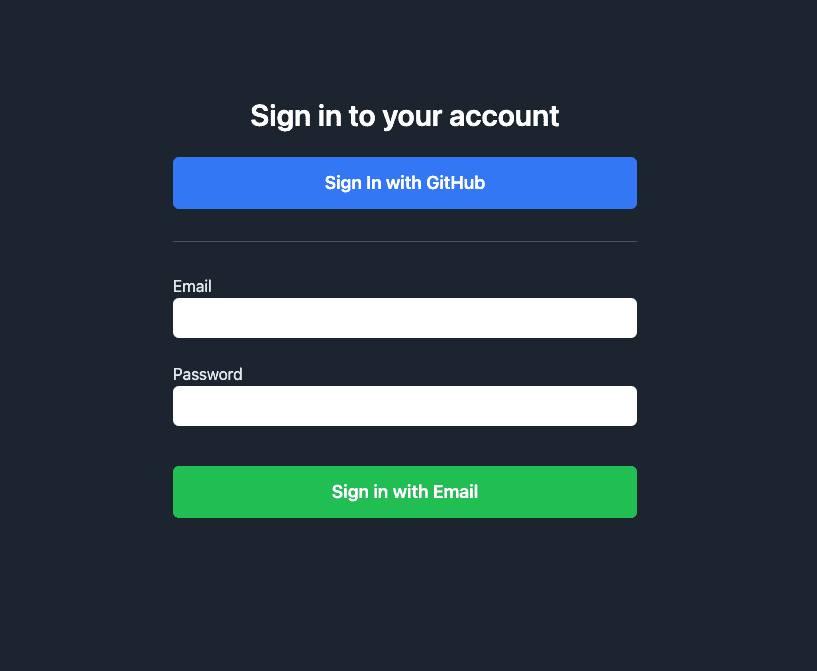
return (
<div className="h-screen flex items-center justify-center bg-gray-800">
<div className="max-w-lg w-full">
<h1 className="text-3xl font-semibold text-center text-white">
Sign in to your account
</h1>
<div className="flex flex-col p-6">
<button
className="text-lg text-white font-semibold bg-blue-500 py-3 px-6 rounded-md focus:outline-none focus:ring-2"
onClick={handleSignInWithGitHub}
>
Sign In with GitHub
</button>
<hr className="bg-gray-600 border-0 h-px my-8" />
<form className="flex flex-col" onSubmit={handleSignIn}>
<label htmlFor="email" className="text-gray-200">
Email
</label>
<input
className="py-2 px-4 rounded-md focus:outline-none focus:ring-2"
type="email"
id="email"
value={email}
onChange={(e) => setEmail(e.target.value)}
/>
<label htmlFor="password" className="mt-6 text-gray-200">
Password
</label>
<input
className="py-2 px-4 rounded-md focus:outline-none focus:ring-2"
type="password"
id="password"
value={password}
onChange={(e) => setPassword(e.target.value)}
/>
<button
className="mt-10 text-lg text-white font-semibold bg-green-500 py-3 px-6 rounded-md focus:outline-none focus:ring-2"
type="submit"
>
Sign in with Email
</button>
</form>
</div>
</div>
</div>
);
};
export default SignIn;The final result with Email authentication and Social login with GitHub:
Conclusion
You can take the authentication process a step further by adding email verification, whereby users' emails are verified before they are authorized to access the protected pages.
Supabase is very easy to setup and also has a well-written documentation. As a beginner, you can get your web application up and running in minutes with few installations and configurations.
Thank you for reading this far!
I also write about another article about authentication with a tutorial on how to implement Next.js amplify cognito with React and TypeScript. If you are also building a SaaS, you might also interested in my story on how I build my Next js SaaS Boilerplate with user authentication and Stripe payment.